This page explains how to set up the "Windows Mail" e-mail program that comes with Microsoft Windows Vista to send and receive e-mail for a POP mailbox that you've created.
To avoid confusion, we should mention that "Windows Mail" is the actual name of the mail program that comes with Windows Vista, not a generic phrase meaning "any e-mail program on Windows Vista".
These instructions are based on Windows Mail version 6.0, which is the version that comes with Windows Vista.
1. Start Windows Mail
Start the Windows Mail program from your Start menu. If you do not have any mail accounts defined yet, the Internet Connection Wizard will automatically begin and will display the Your Name window. If this happens, continue with step 4 of these instructions.
2. Begin adding a new e-mail account
Open the Tools menu and choose Accounts.

The Internet Accounts window opens. Click Add.

3. Choose to define an e-mail account
When prompted to select the type of account to add, select E-mail Account, then click Next.

4. The Your Name window appears.
The wizard asks for your name. This is the name that other people will see when you send them e-mail. It should usually be your real name, such as John Smith or Joan of Arc.
Enter the name you want other people to see when you send them e-mail, then click Next.

5. The wizard asks for your Internet E-mail Address.
Enter your e-mail address, then click Next. Be sure to enter your full e-mail address, including the initial account name part, the @ sign, and the domain name.

6. The wizard asks for your E-mail Server Names.
Leave the server type as POP3 and type mail.newportnet.com as the name of both your incoming and outgoing server. Do not check the Outgoing server requires authentication checkbox. Click Next.

7. The wizard asks for your Internet Mail Logon.
Your logon is your e-mail account name and password, not your email address.
Type your account name. (The account name must be all lowercase.)
Type your e-mail password, which is the password you chose for this e-mail account.
If you wish, check the Remember password box so you don't have to type it each time you send or receive e-mail.
Click Next when finished.

8. The final screen of the wizard appears.
Check the Do not download my e-mail at this time checkbox, then click Finish.

While the wizard has collected the basic information needed to receive e-mail, a couple of other changes are needed to make sure that you can send mail. Continue with the steps below to finish setting up Windows Mail.
9. Open the Properties window for your new account.
The Internet Accounts window should still be open. (If not, you can open it by choosing the Accounts command from the Tools menu.)
Highlight your e-mail account and click Properties.

10. The Properties window appears.
Click the Servers tab.
Ensure the box next to the My server requires authentication is checked.
Also, note that you should not check Log On Using Secure Password Authentication.
The window should look like this:

11. Click on Settings
Ensure the button is marked for Use same settings as my incoming server.
Click Ok.

12. Verify the SMTP port number.
Verifying the SMTP port number ensures that your ISP will not block outgoing mail connections to our mail servers.
Click the Advanced tab.
Verify that the Outgoing mail (SMTP) port number is 25 and the incoming mail (POP3) is 110.
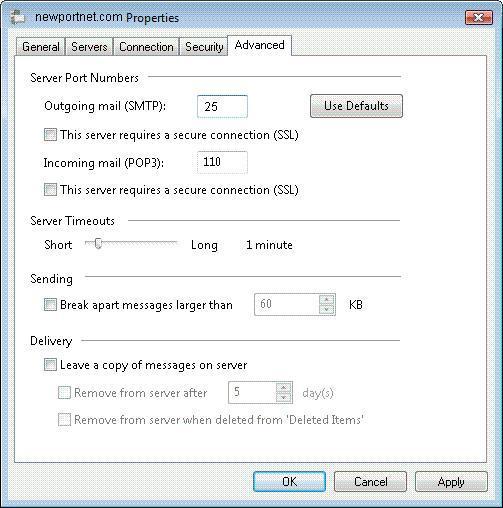
If you use more than one method to read your e-mail (for example, if you read mail on more than one computer, or if you sometimes read e-mail using our Webmail pages as well), you should also check Leave a copy of messages on server, setting it for at least a few days. This makes sure that mail you read in Windows Mail will be seen by the other computer or Webmail.
Click the Advanced tab, then check the Leave a copy of messages on server checkbox.

To make sure copies of every message don't stay on the server forever (which can slow down your mail connections and use up your disk space allowance), we also recommend checking the box marked "Remove from server after X days". Choose a number of days that's long enough that you'll be able to read the messages in your other mail program (or Webmail).
The "Remove from server when deleted from 'Deleted Items'" checkbox controls whether an email that you delete from your computer will also get deleted from the server before the number of days specified above is reached. If you check the checkbox, then messages deleted from your computer will always be deleted from the server. If you do not check the checkbox, then messages deleted from your computer will not be deleted from the server until the specified number of days has passed (assuming that the "Remove from server after X days" checkbox is checked).
Setup is complete
You're finished! Try sending yourself a test e-mail message to make sure it works.
NOTE: As a courtesy, we provide information about how to use certain third-party products, but we do not endorse or directly support third-party products and we are not responsible for the functions or reliability of such products. Windows Mail® is a registered trademark of Microsoft Corporation in the United States and/or other countries. All rights reserved.